
There’s something quietly impressive about a well-built retaining wall—it speaks of care, craft, and a garden properly thought through.
It doesn’t just hold soil in place; it anchors the whole design, adding shape and structure with effortless grace.
This guide shows you how to build one that’s not only sturdy but also an absolute credit to your outdoor space.
Start with the Lay of the Land
Before committing to construction, take time to understand the terrain. Pay close attention after rainfall, as this reveals natural drainage patterns and weak spots in the landscape.
Places that collect water or see fast run-off are best avoided, as moisture is the quiet saboteur of wall stability.
Try to build with the site, not against it. Gently sloping areas lend themselves more readily to tiered walls or curved structures that soften hard edges. You can use stakes and string to sketch out potential lines, giving yourself a clear visual reference.
Planning the wall’s orientation with sun exposure in mind also helps. Shaded corners can stay damp for longer, which can affect long-term wear.
Equally important is understanding how your garden is used. Are you bordering a lawn where children play or framing a quiet seating area?
These practicalities influence how high the wall should be and whether it might benefit from built-in seating, planters, or pathways.
In busy corners of the garden, a lower wall can be more suitable to avoid visual or physical obstruction, while in terraced designs, careful alignment ensures walkways remain comfortable and safe to navigate.
Know the Rules and Test the Ground
Council restrictions aren’t the most thrilling part of the project, but they are critical.
From height limits to how close you can build to a neighbour’s fence, skipping the small print can cause long-term headaches. If the wall is over a certain height or supports a significant load, you may even need approval from a structural engineer.
Soil testing is equally essential. Clay-heavy soils, for instance, expand and contract with moisture, putting pressure on even well-built walls. Sandy soil, while free-draining, can lack the support required for heavier structures.
Accordingly, a basic geotechnical test can tell you what lies beneath, and what to do about it. Knowing your soil’s quirks allows you to design a solution that holds firm through the seasons.
Plan with Purpose
Every garden has its own rhythm, and your retaining wall should complement it rather than compete.
Where does it lead the eye? Does it divide, support, or unify spaces? These aren’t aesthetic musings—they’re practical considerations that affect flow, functionality, and even the usability of your space.
Calling in a garden design team at this stage can offer insights that go beyond what’s visible. They can spot potential pinch points, suggest subtle shifts in placement, and ensure your wall complements adjacent features like patios, trees, or borders.
They also help you balance ambition with realism, ensuring that your plans align with your budget and terrain. A well-placed wall won’t just look right—it’ll feel inevitable.
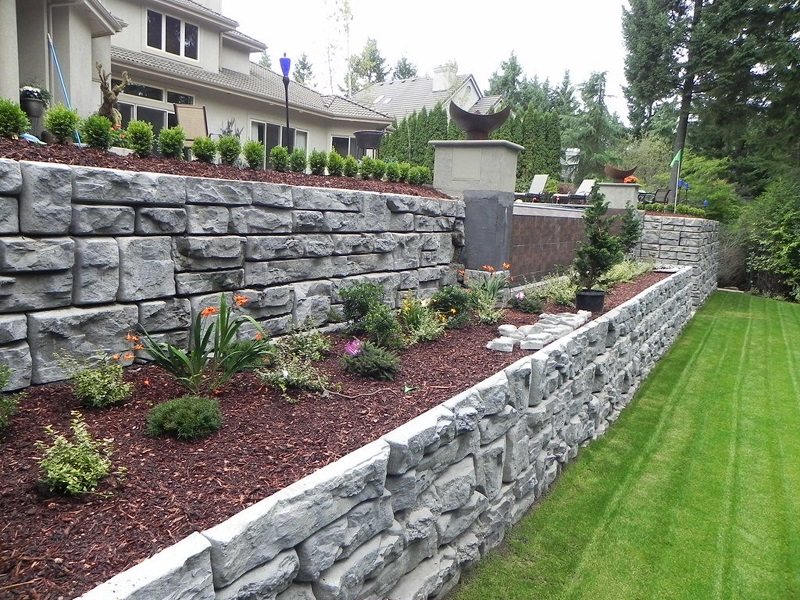
Choose Materials That Suit Both Style and Climate
Every material tells a story.
Concrete blocks convey order and strength, perfect for modern gardens where crisp lines dominate. Natural stone suggests permanence, grounding the landscape in a way that feels organic.
Timber, while friendlier on the purse strings, brings a rustic softness that can work beautifully in more relaxed settings.
But beauty means little without resilience. In frost-prone regions, stone needs to be laid with flexibility in mind to avoid cracking. In wetter climates, timber can demand extra sealing or more frequent maintenance.
Moreover, pay close attention to the material’s rating for ground contact and its resistance to rot, weathering, or insects.
Sourcing from a trusted supplier helps ensure that what arrives on site is fit for purpose, not just attractive in a brochure.
Lay a Strong Foundation and Think Ahead
The real strength of any retaining wall lies below ground. A shallow or rushed foundation invites trouble, even if everything above appears straight.
Dig a trench that is not only wide and deep enough for your blocks but also allows room for drainage material. This trench should sit below the frost line in colder regions to prevent heaving as temperatures shift.
Gravel serves a dual purpose. It acts as a base and helps draw moisture away from the structure. As you build upwards, each row must be checked for level.
The smallest tilt in the first course can magnify as you go. Using a string line and spirit level after every few layers keeps things honest.
In addition, backfill as you go with compacted gravel to maintain pressure balance. Planning now for natural expansion and settling prevents movement later.
Mind the Finish and Keep Water Moving
No matter how solid your wall looks, water will find its way through and around it. Drainage is inevitably necessary and not optional.
Perforated pipes, wrapped in filter fabric to prevent clogging, should be placed at the base of the wall and sloped slightly to direct run-off away. Don’t forget to include weep holes at regular intervals if your wall exceeds a metre in height.
A well-placed capstone adds polish, but also shields the wall from rain and root intrusion. Choose one that’s slightly wider than the wall beneath it to shed water efficiently.
Adhere it firmly, but allow it to cure fully before adding pressure or load. For an extra flourish, low-voltage lighting or trailing plants like creeping thyme can soften the structure and tie it beautifully into the surrounding landscape.
With these final touches, your wall becomes more than just functional—it settles into the space as if it were always meant to be there.
Conclusion
Well done! You’ve just wrapped your head around one of the most rewarding garden upgrades there is.
When you take the proper approach, you’re creating a feature to be proud of rather than just constructing a wall.
Now step back, admire your handiwork, and enjoy the garden you’ve shaped with purpose and care.